Roaring Temple Dungeon Walkthrough
- Posted on October 10, 2024
- Gudes
- By Olga
- 5883 Views
The guide for the Roaring Temple Dungeon in Throne and Liberty explains the mechanics and walkthrough for the dungeon, which becomes available at level 30 and requires 900 combat power. The dungeon features three bosses: King Chimaerus, Ancient Berserk Dark Enforcer, and Ancient Berserk Shade Wizard. Their attacks and mechanics are described, including powerful AoE strikes, teleportation, and summoning zombies. The final boss, King Chimaerus, has complex attacks such as poisonous pools, fireballs, and a powerful AoE attack that must be prevented using statues.
Welcome to this comprehensive Roaring Temple Dungeon walkthrough for Throne and Liberty! This guide covers all the crucial details you’ll need to successfully complete the dungeon, including key mechanics and strategies to defeat each of the bosses.
What is the Roaring Temple in Throne and Liberty?
The Roaring Temple is the second dungeon that players unlock in Throne and Liberty upon reaching level 30. Alongside the other two starter dungeons—Specter’s Abyss and Cave of Desperation—this dungeon introduces core boss mechanics, preparing players for more challenging content. You can enter the Roaring Temple from the Co-Op Dungeons tab in your game options. Additionally, you can initiate party matchmaking from there, which will form a team of six players and teleport you directly to the dungeon. To participate, players must have reached level 30 and possess a minimum Combat Power of 900.
Roaring Temple Boss Encounters
Inside the Roaring Temple, players must overcome three bosses to complete the dungeon: one main boss and two mini-bosses. The bosses are:
-
King Chimaerus
-
Ancient Berserk Dark Enforcer
-
Ancient Berserk Shade Wizard
Roaring Temple Map
Ancient Berserk Dark Enforcer (First Boss)
The first boss you'll face is the Ancient Berserk Dark Enforcer. However, before engaging him, you’ll need to take down barriers that block your progress. Start by defeating enemies in the initial area to bring down the first barrier. Afterward, drop down and clear out the second zone, interacting with the first Mana Fluid Regulator. This will flood the area, unlocking the path forward. Repeat these steps until you reach the Dark Enforcer's location, where the battle can begin.
Boss Mechanics:
-
The Dark Enforcer attacks with a scythe and occasionally performs an area-of-effect (AOE) swing or charges a powerful Fury Attack that can knock down players.
-
His deadliest move is a large fire-based AOE that inflicts a burning effect on your party.
Defeating this boss removes the next barrier. You’ll then have to fly across a room while avoiding fire pillars to continue. Clear the enemies in your path until you reach the next boss.
Ancient Berserk Shade Wizard (Second Boss)
The Ancient Berserk Shade Wizard serves as the second boss of the dungeon. Defeating him unlocks the path to the final boss.
Boss Mechanics:
-
He primarily attacks with his staff, launching projectiles and placing ground AOEs targeting the player with aggro.
-
He occasionally summons two Ancient Zombie Mutts to aid him.
-
The Shade Wizard has the ability to teleport around the area and, during a Fury Attack, stuns the party while summoning more AOEs. To prevent being stunned, block his Fury Attack and dodge the subsequent AOEs.
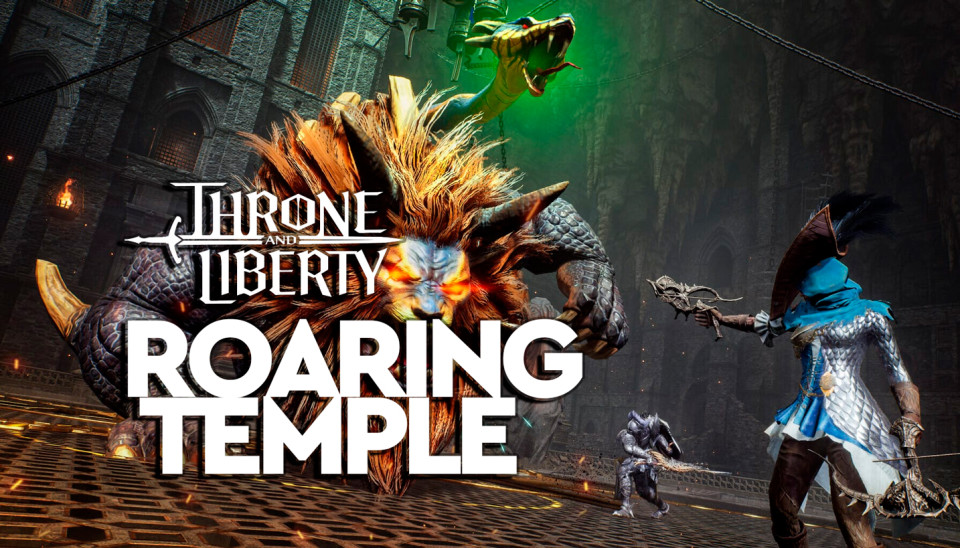
King Chimaerus (Main Boss)
King Chimaerus, the main boss of the Roaring Temple Dungeon, presents a more challenging encounter compared to the previous two.
Boss Mechanics:
-
Chimaerus performs powerful claw attacks on the player with aggro.
-
He spits poisonous pools at three random players, which can’t be blocked. Players must move out of the poison to avoid damage.
-
Chimaerus randomly targets players with a paralyzing poison, marked by a green aura. After a brief delay, he fires three deadly fireballs at the marked player. To survive, the affected player should move far away from the boss, while the tank positions themselves between the boss and the targeted player to block the fireballs.
-
Periodically, Chimaerus jumps to the center of the room and unleashes a massive AOE attack that will wipe the entire party. To avoid this, four players must jump onto specific statues marked with colored flags (Red, Yellow, Green, and Blue) around the room. This triggers water to fall onto the boss, interrupting the attack.
Recommended Weapon Combos for Roles
To defeat King Chimaerus, here are some suggested builds and roles:
|
Weapon Combo |
Rating |
Role |
Explanation |
|
Greatsword / Sword and Shield |
★★★★★ |
Tank |
Ideal for tanking and mitigating King Chimaerus' attacks. |
|
Longbow / Crossbow |
★★★★★ |
DPS |
Provides crucial ranged damage while keeping players near pillars. |
|
Staff / Crossbow |
★★★★ |
DPS |
Effective for magical damage and staying positioned safely. |
|
Wand / Staff |
★★★★ |
Support |
A solid healer setup, with offensive potential for helping the party. |


Write a Response