Fast Leveling Guide 1-50
- Posted on October 8, 2024
- Gudes
- By Olga
- 7230 Views
This guide will help you optimize the leveling process and minimize the time spent on leveling up your character.

Welcome to the Throne and Liberty Leveling Guide. Leveling in Throne and Liberty is straightforward, as the developers have made it player-friendly. The quickest way to earn EXP is by focusing on the Main Story Quest (MSQ). While Contracts and Gathering also provide experience, they are not as efficient as sticking to the MSQ.
At certain points, you may find yourself unable to continue the MSQ due to being under-leveled. When this happens, take on some Exploration Codex Quests to gain the necessary EXP and level up. As soon as the next MSQ becomes available, stop working on the Exploration Codex Quests and return to the main storyline! This guide will help you identify which Exploration Quests to complete to minimize your leveling time.
We have gathered the best tips for you and tested them ourselves to ensure your convenience and comfort. With our guide, switching characters, if you're not satisfied with the one you've leveled up, becomes even easier.
-
Reach Kastleton
The Prelude serves as an introductory "Tutorial," walking you through the game's essential mechanics, including combat systems, morphing, and the grappling mechanics. Once you've completed the Prelude, you'll arrive at the docks of Kastleton. - Finish Chapter 1
Towards the conclusion of Chapter 1, there's a quest titled "Janice's Advice," where you’ll need to inspect a book to uncover a hidden key. You’ll have to interact with specific areas of the object to reveal the key. Here's how to correctly interact with the book:

- Complete Chapter 2 + Appendix
Once you hit Chapter 2, you’ll encounter additional quests labeled with "Appendix." While leveling up to 50, prioritize completing these "Appendix" quests whenever possible as they provide extra EXP.
Before boarding the Ship in Chapter 2, interact with this bottle to gain some extra EXP:

The quest "Appendix: The Hero of the Wolf Hunting Contest" can be finished in the last 5 minutes of the Event, so there's no need to spend the full 20 minutes on it.
-
Create Green Gear
Early in Chapter 3, the quests will lead you to Urstella Fields. Before heading there, ensure you've crafted all the Green Items you can. You should have enough materials to create 2 Green Weapons, 4 Green Armors, and at least 2 Green Accessories. If you can't complete all the armors right away, that's fine—you’ll finish crafting the rest by the end of Chapter 4. -
Resistance Contracts in Chapter 3
The first few quests will ask you to choose 4 Resistance Contracts to complete. If possible, prioritize "Quality Lithograph: Accessories." This will help later on, as many players aim to finish Elemental Rings. The "Violent Signet" is one of the best Blue Rings for many DPS characters.
When you're prompted to buy items using Contract Coins, don’t complete the Appendix Quest until you're level 20 unless you already have 4 "Quality Lithograph: Accessories." If you do, purchase the Mystic Key and unlock Mystic Globes in the open world for additional EXP and progress items.
Check out our comprehensive guide on Mystic Globes and Portals!
-
"Veterans Never DiePortals" Questline in Chapter 3
In this quest, you'll need to dance with Goblins. To do this, use the ability that matches the color of the circle surrounding the goblin.
-
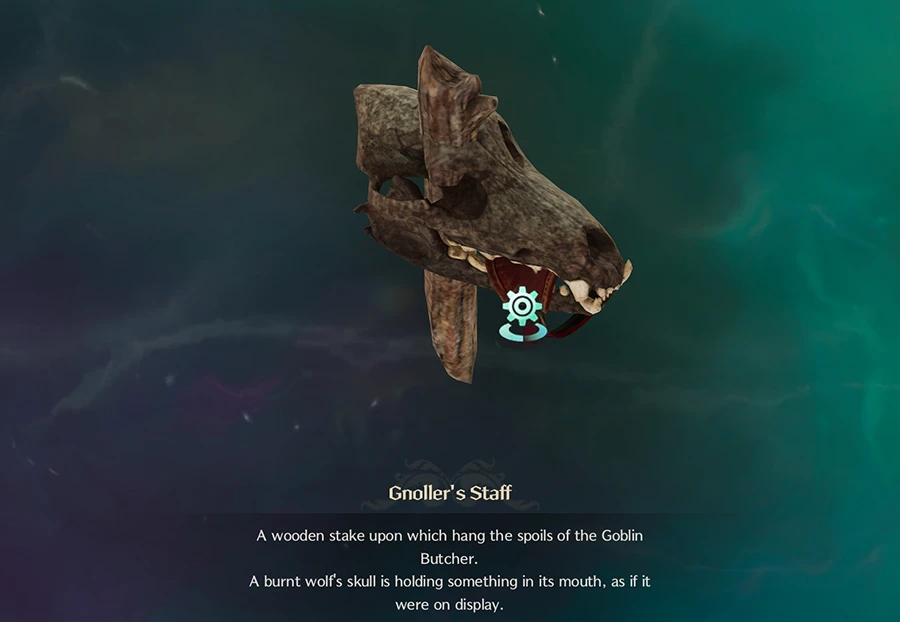
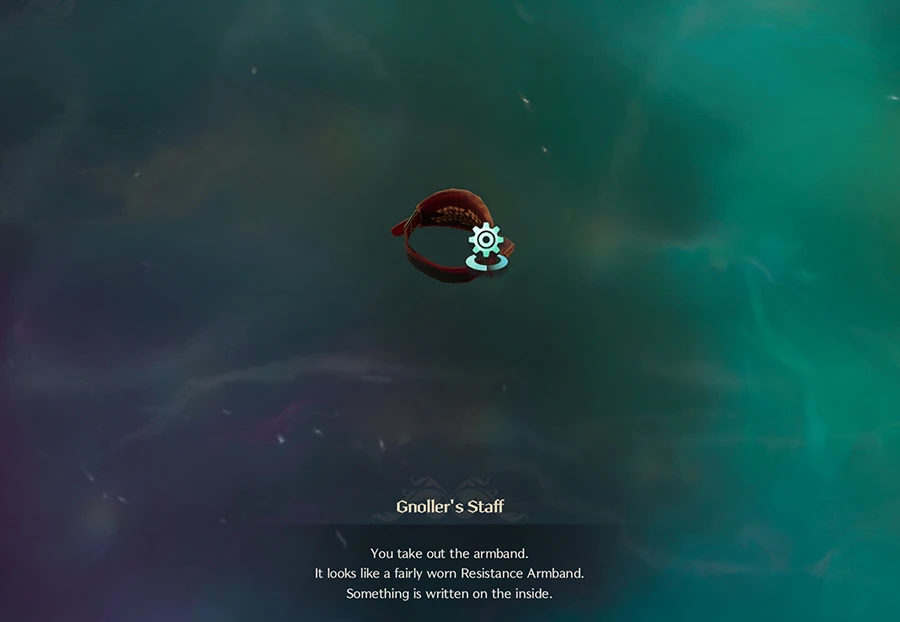
"A True Captain" Quest in Chapter 3
In this quest, you’ll investigate the Gnoller’s Staff. Here are the specific spots to click on the staff to proceed: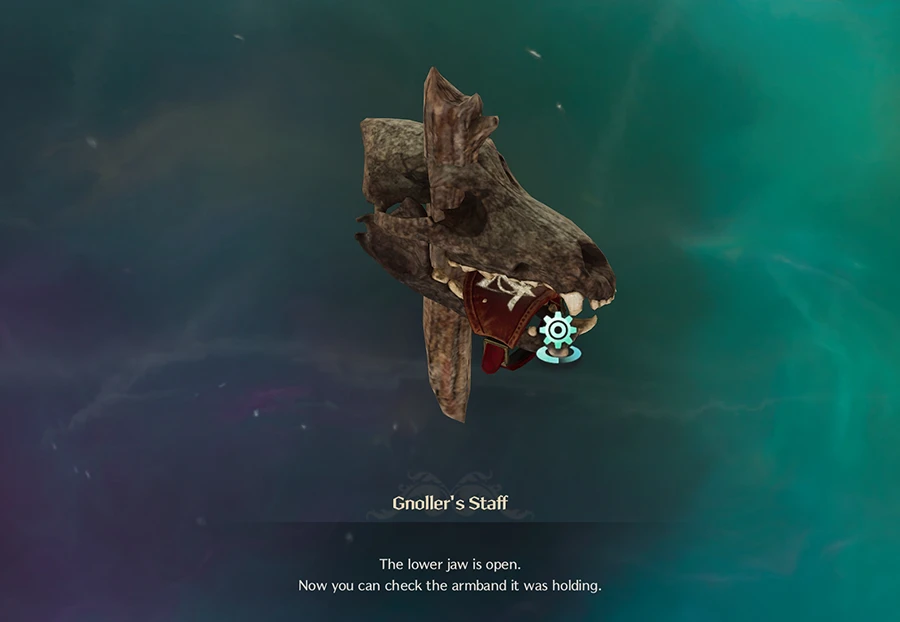
-
"Appendix: Ashien’s Strange Painting" in Chapter 3
After examining the painting, this Appendix quest introduces you to Taedel's Tower, which is similar to "Solo Boss Rushes" from other games. Each floor is locked behind certain level requirements and rewards you with EXP and progression items. Complete the first floor for the quest; the remaining floors can be done later as you require more EXP.
Before heading to Vienta Village, if the Chief Terror Bird at Nesting Grounds is available, defeat it for a bonus EXP boost.
For more details on each floor's bosses and mechanics, check out our Taedel's Tower Guide! -
Complete Crafting Green Gear
Before departing from Vienta Village, make sure to finish crafting the remaining pieces of your Green Gear. - Chapter 4 Reward
The rings you receive in Chapter 4 aren't useful for any character since they lack special stats compared to the Traits you can get from your Green Rings.
-
Levels 22 - 23
To continue with the Main Story Quest, you need to reach Level 23. This will be your first experience of an EXP bottleneck during the leveling process. Clear the second floor of Taedel’s Tower, then complete some of the Exploration Codex Quests in Monolith Wastelands. Avoid "Treasure of Daybreak" as it requires completion at a specific time of day, which may waste your time. - Complete Chapter 5
Most of Chapter 5 is straightforward and doesn't require much explanation. However, the quest "A Sacred Pledge of Blood" includes a timed segment. -
Levels 26 - 28: Abandoned Stonemason Town
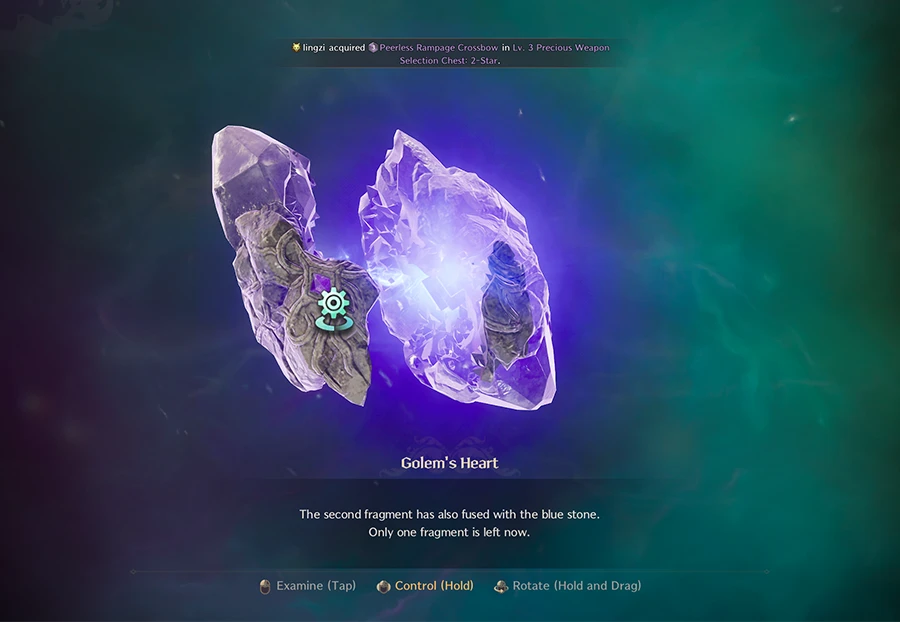
Upon finishing Chapter 5, including the Appendix quests, you should be around Level 26—unless you haven’t fully completed the Monolith Wastelands Exploration Codex Quests. Next, head to Abandoned Stonemason Town and start the "Won! Golem's Manastone" Exploration Codex.
IMPORTANT: Speak to the Golem Crafter before progressing with the rest of the Exploration Codex. Doing this will save you time. After that, continue with the Abandoned Stonemason Town Exploration Quests.Recommended Exploration Quests:
-
Won! Golem's Manastone
-
A Powerless Little Friend
-
Skip the quest that requires you to collect Vitality Masses due to the low drop rate.
-
Intimidating Breath
When doing "Won! Golem’s Manastone," you'll need to bid on specific items based on the keywords mentioned by the auctioneer. If they mention a sword, ignore it.
For the first item, place a bid when the NPC talks about "bringing dead golems back to life."
For the second item, bid when they mention "Mana" or "you can craft a weapon." The translation from Korean is slightly inaccurate, so look for either of these phrases.
The second item is only available for bidding at night. Complete other quests and return when it's nighttime. -
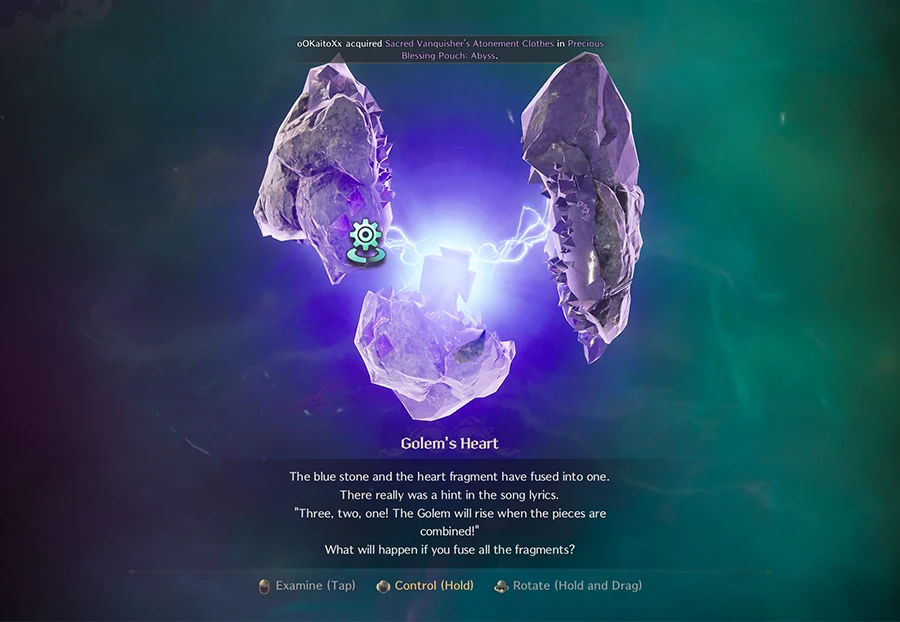
- Complete Chapter 6
Chapter 6 is quick to complete, but for the quest "Restoring the Heart," you need to rotate the item to locate the purple diamonds. Click on the spots with purple diamonds, starting with the section that has three diamonds.


After completing Chapter 6, you'll get to choose a reward. Refer to your Weapon Combination's Leveling or Build Guides to determine which reward, if any, will be beneficial for your future builds.
-
Levels 30 - 32
Once you've completed Chapter 6, you should be at Level 30 or 31. To reach Level 32 and continue the Main Story Quest, complete the Exploration Quests in Moonlight Desert, then head to Sandworm Lair.
Recommended Moonlight Desert Exploration Quests:
-
Queen's Blessing
Only gather 2 Star Trees. You can do the first part if you're in the area as it transitions between day and night. -
Sands that Make Money
This item can only be purchased at night. Complete other quests and return at night. -
Beyond the Sandstorm
This quest is fairly simple—use the sand tornadoes to navigate the area. -
Secret in the Sand Dust
Near the end of this quest, you'll need to follow a doll and pick the correct hole—the one the doll doesn't enter.
Level 30+ Sandworm Lair
Recommended quests from the Sandworm Lair Exploration Codex:
-
Qualification of Being a Guild Owner
-
The Voice Behind the Mask
Skip following all of the Guiding Lights and head directly north of Queen's Trap to enter the Unknown Rift.
For the Stronger Sandworm quest, you can skip the task requiring you to kill 25 ants. After completing these quests, you should be around Level 32. If you're not, revisit any bosses in Taedel's Tower that you haven't defeated yet. Also, be sure to finish any Exploration Quests that depend on Day/Night cycles.
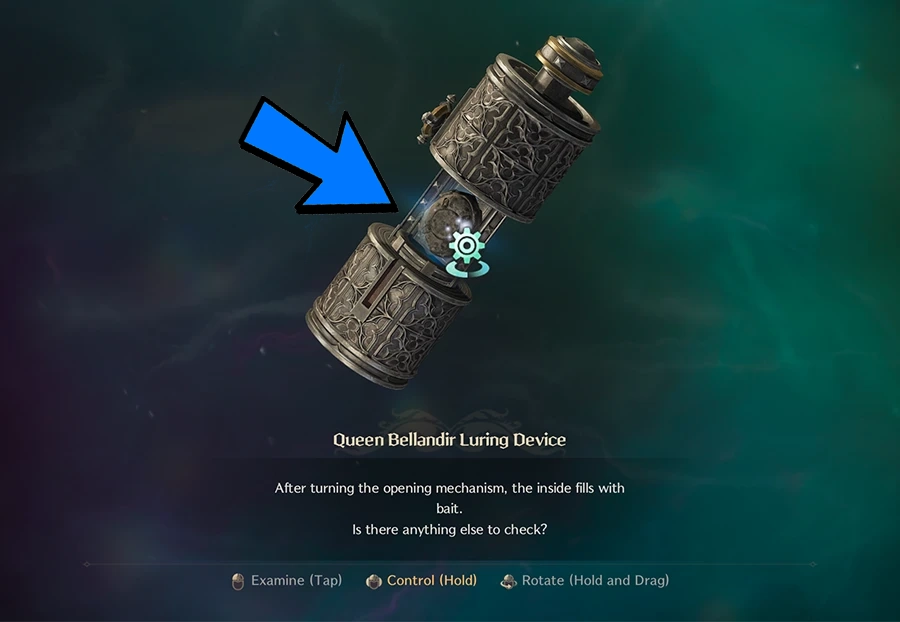
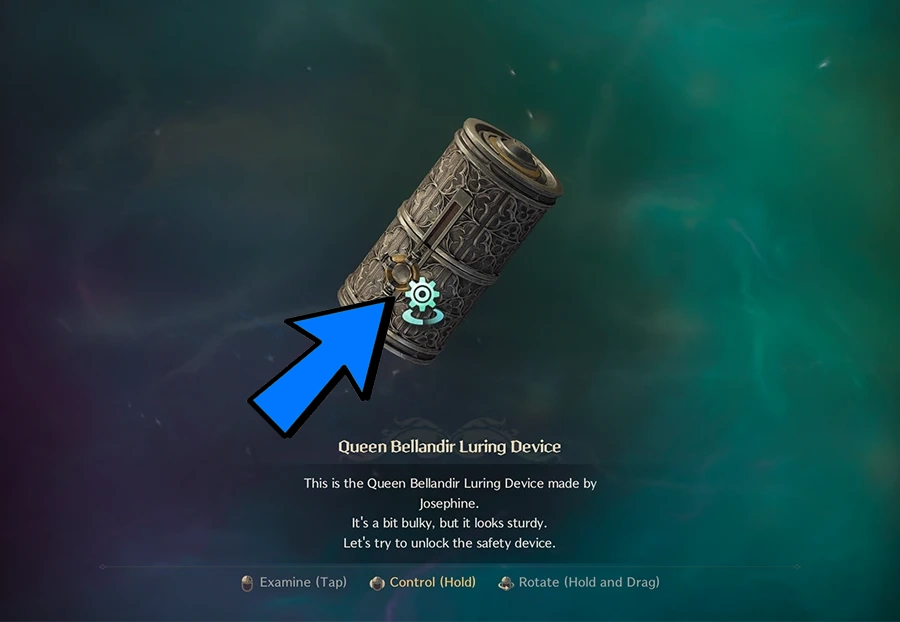
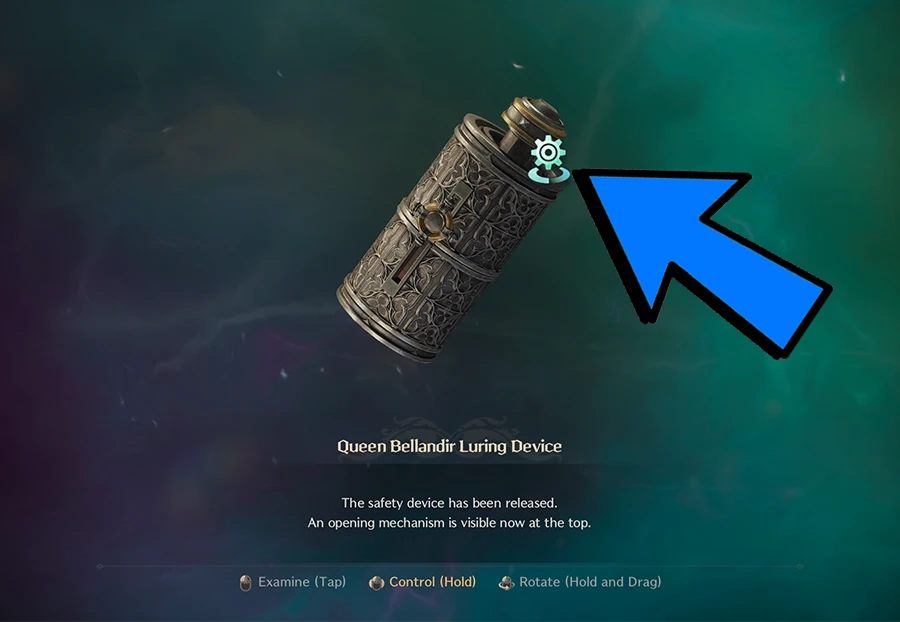
Chapter 7: Luring Device
During the Queen Bellandir Luring Device quest, interact with the device and select the items in the following order:
Chapter 7 Reward
When choosing rewards, check your Weapon Combination's Leveling or Build Guides to determine if any of the rewards can be useful for future builds.
Level 36 - 38
Start by clearing floor 6 of Taedel Tower if it's manageable, otherwise save it for later. Afterward, head to Daybreak Shore (south of Sanctuary Oasis) and complete its Exploration Quests. Some quests can only be completed at night, so if you don't reach Level 38 due to the timing, head to The Raging Wilds to finish more quests.
Daybreak Shore's quests are generally straightforward. However, in Danger Within Peace, you’ll need to find the "Collection: To Pirate King Adelico" page, located on the backside of a small hill near the water.
Chapter 8 and The Raging Wilds
Congratulations, you're almost finished! Complete Chapter 8 while finishing the Exploration Quests in The Raging Wilds. The chapter involves killing a couple of bosses, but they're easy. You can also return to The Raging Wilds after finishing Chapter 8 or complete the quests while you're already there, depending on your preference.
Havres Boss Fight
When Havres becomes immune to damage, a heart will emerge and head toward him. Stand next to the heart as Havres performs his lightning attack; this will destroy the heart and allow you to continue dealing damage.
Risieth Boss Fight
Risieth has a couple of mechanics to watch for:
-
When she spawns her clones, the real Risieth retains any debuffs you've applied, such as DoTs.
-
Use the puddles to extinguish the burning stacks she causes when she explodes.
Chapter 8 Reward
For rewards, consult your Weapon Combination's Leveling or Build Guides to see if any of the options can be beneficial for future builds.
Level 43 - 45
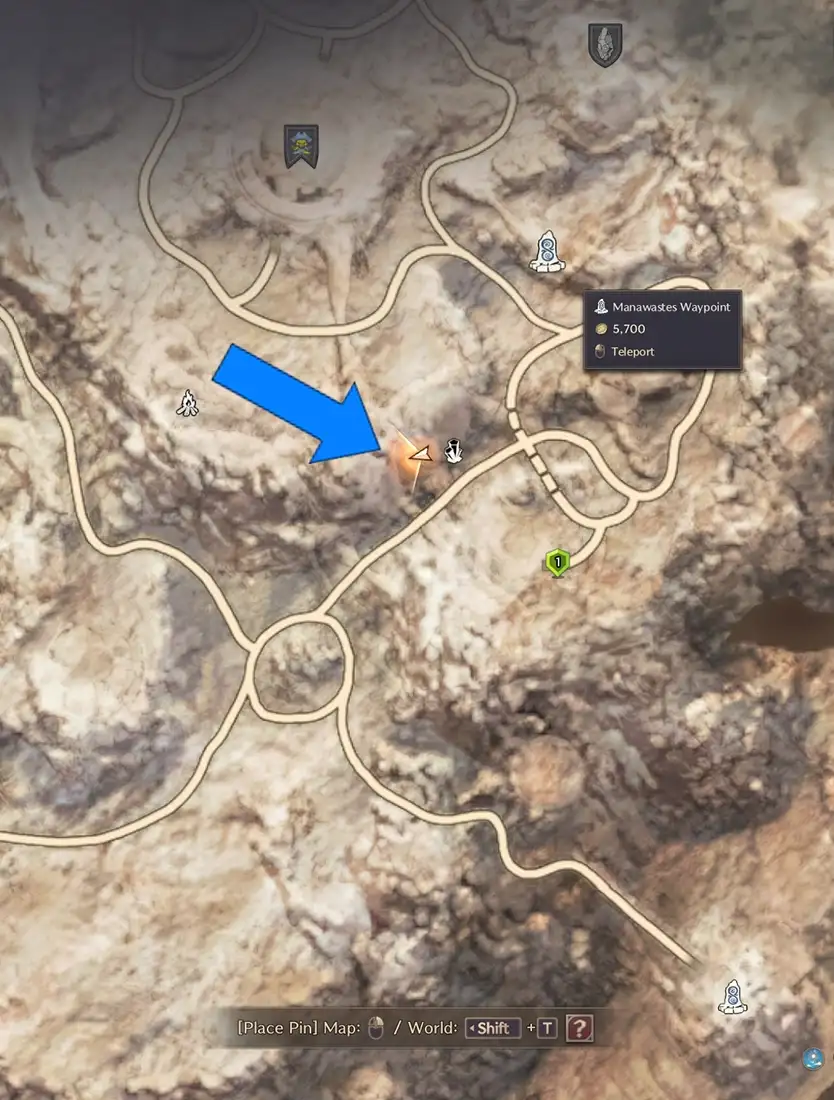
This is the final EXP bottleneck! After hitting Level 45, you can focus on the MSQ. At Level 43, head to Manawastes and complete all available Exploration Codex Quests. If any are locked due to Milestones, don't worry—there’s still plenty of EXP available. Completing 1-2 Exploration Quests in Akidu Valley should bring you to Level 45.
Manawastes Exploration Quests
Complete all Exploration Quests in the Manawastes. If you run into Milestones, no problem—there’s enough EXP available elsewhere. Below are images showing where you can find the Collection Page for one of the quests:
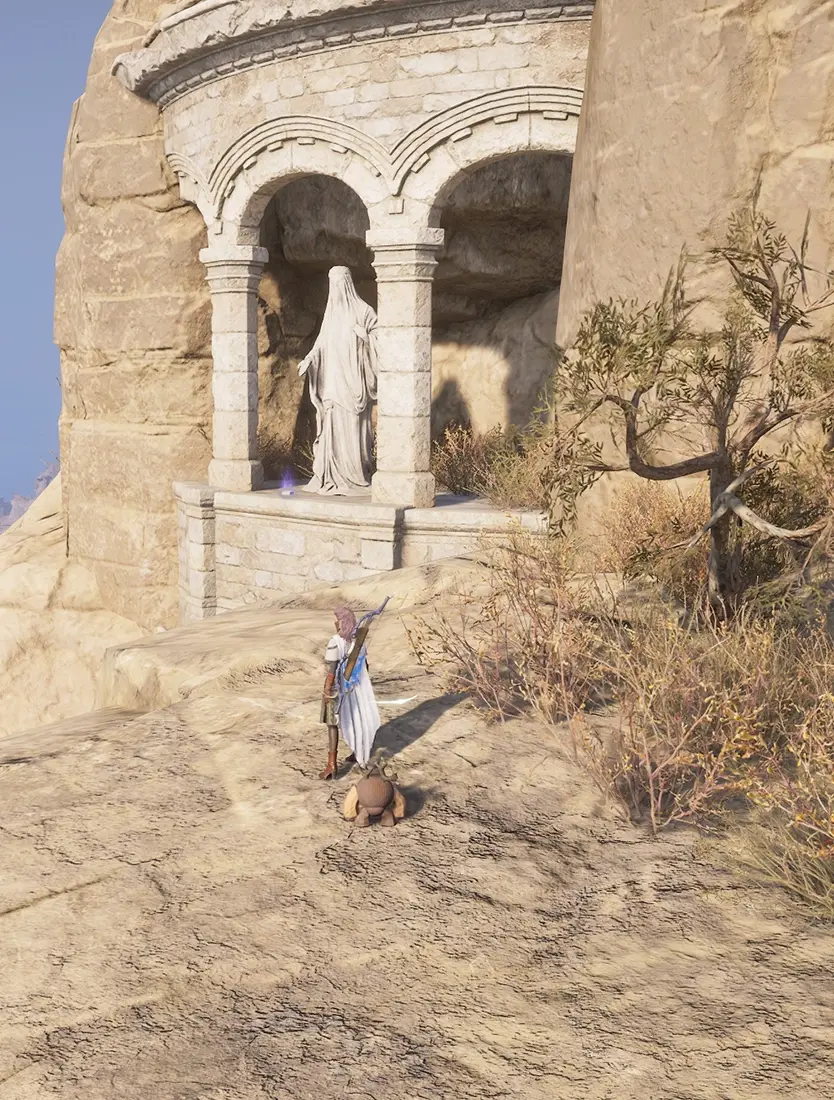
Junobote's Examination Paper
This quest features various tests to complete. Below is a helpful guide for solving them:
-
Rotate statues to form the correct shadow image.
-
Interact with the musical statues in the numbered order.
-
Adjust the platform height by interacting with the pylons, following the numbers above each pylon.
Images for reference:


Akidu Valley
You’re almost at the end of your leveling journey! The Finding the Infiltration Route quest provides a large EXP reward, so do that first. After that, complete the Stop the Dark Ritual Exploration Quest. If you notice other players fighting an elite mob, join in to earn about 70k EXP.
If you've completed the Appendix Quests and Co-Op Dungeons along with opening the treasure chests at the end, you might not need to finish Stop the Dark Ritual to reach Level 45.
Chapter 9: Escaping the Valley
From here, focus on completing the Main Story Quest to quickly reach Level 50!
Chapter 9 Reward
When choosing rewards, refer to your Weapon Combination's Leveling or Build Guides to check if any rewards are beneficial for future builds.
Finishing Chapter 10: Nightmare Deja Vu
Finally, you're at the end! To avoid detection, stick to the shadows and avoid mobs.
Chapter 10 Reward
Most players opt for Precious Lithograph: Heroic Armor of the Resistance, which provides Max Health and Melee Evasion. However, consult your Build Guides to decide which reward might be best for your future build.
Stick to the Main Story Quest for the best EXP gain. Gathering and Resistance Contracts don't provide as much experience.
For sub-50 Party Dungeons, opening chests at the end provides just enough EXP to hit Level 45, needing only one Exploration Codex Quest in Akidu Valley.
Additionally, open Mystic Portals during leveling to earn extra EXP and progression materials. By the time you finish Chapter 3 and leave Kastleton, you should have at least 2 Green Weapons, 3-4 Green Armors, and 2 Green Accessories.
After Chapter 4, you can craft a full set of Green Gear, which will be enough to complete all Main Story Quests. Always refer to your Weapon's Build Guides to check if Chapter Rewards can be used in future builds.


Write a Response